
Say Goodbye to Drafts and Leaks! A Step-by-Step Guide to Adjusting Aluminum Window Hinges for a Perfect Seal
Have you ever faced this frustration? Even when your windows are shut tight, the moment the wind picks up or it starts to rain, you hear the wind whistling right by the window—or worse, rainwater seeps inside, dampening the windowsill. In winter, cold drafts stream in, causing you to waste money on heating; in summer, the cool air from your air conditioner leaks out, driving your electricity bills through the roof.
The vast majority of these issues stem from a single critical component: the improper adjustment of aluminum window hinges. As the core hardware connecting the window frame to the sash, the condition of the hinges directly determines the window’s sealing performance, ease of operation, and even its overall service life. Many households mistakenly assume that their windows are simply aging and require replacement; however, in many cases, a simple and proper fine-tuning of the hinges is all that is needed to give the windows a “new lease on life.”
This article provides a comprehensive breakdown of how to adjust aluminum window hinges—covering everything from understanding the hinge structure and precisely diagnosing issues to hands-on practical application—and concludes with a FAQ section to help you permanently resolve the persistent problem of poor window sealing.
I. Getting to Know Your “Gatekeeper”: The Basics of Aluminum Window Hinges
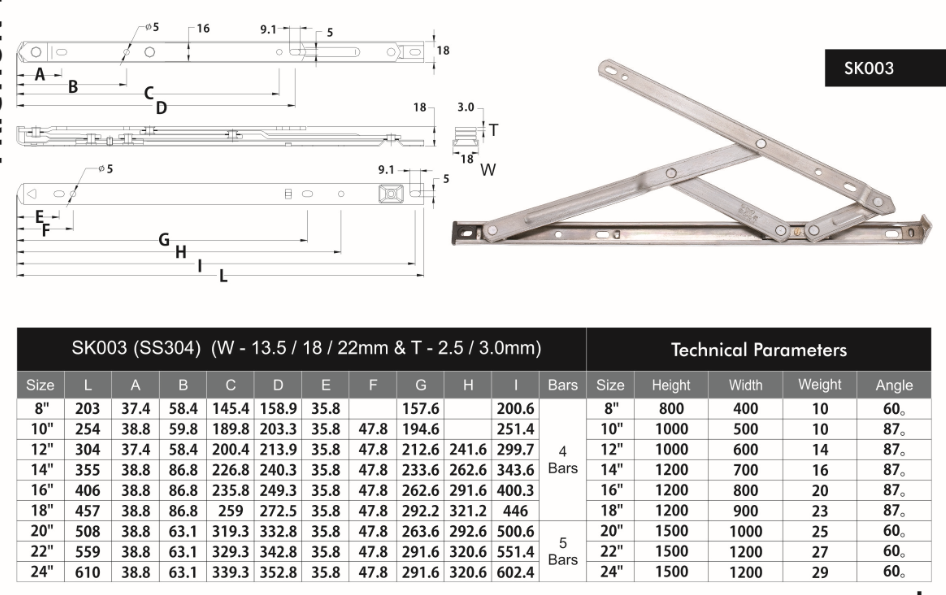
Before attempting any adjustments, we must first understand exactly what this “gatekeeper” is—specifically, its basic structure and operating principles. Aluminum window hinges—also known as “friction stays” or “friction hinges”—are the core hardware components that enable the opening and closing functions of casement windows (including inward-opening, outward-opening, top-hung, and similar styles).
- Main Types of Aluminum Window Hinges
- The aluminum window hinges currently available on the market primarily fall into the following categories: you may wish to first observe your own windows to determine which type they utilize:
- Friction Stay Hinges (Most Common)
- Features: Composed of multiple riveted links (typically 4-bar or 6-bar configurations). The base is fixed to the window frame, while a slider moves within a track to facilitate the opening and closing of the window.
- Applications: The vast majority of outward-opening casement windows and inward-opening casement windows.
- Adjustment Points: Typically feature vertical adjustment screws (located at the junction of the base and the window frame) and horizontal adjustment screws (located on the slider or the links).
- Friction Hinges (Window Stays)
- Features: Possess a relatively simple structure; they utilize their own internal friction to hold the window sash securely at any desired opening angle.
- Applications: Smaller-sized windows or top-hung windows.
- Adjustment Points: Adjustment is primarily achieved by altering the position of the base’s mounting screws to fine-tune the fit between the window sash and the window frame.
- Concealed Hinges
- Features: Invisible to the eye once installed. These are frequently used in high-end thermal-break aluminum windows and doors, offering both aesthetic appeal and excellent sealing performance.
- Adjustment Points: Typically feature three-dimensional adjustability (vertical, horizontal, and depth). The adjustment screws are usually concealed beneath decorative cover plates.
- Friction Stay Hinges (Most Common)
- The aluminum window hinges currently available on the market primarily fall into the following categories: you may wish to first observe your own windows to determine which type they utilize:
- The Core Logic Behind Hinges and Sealing Performance
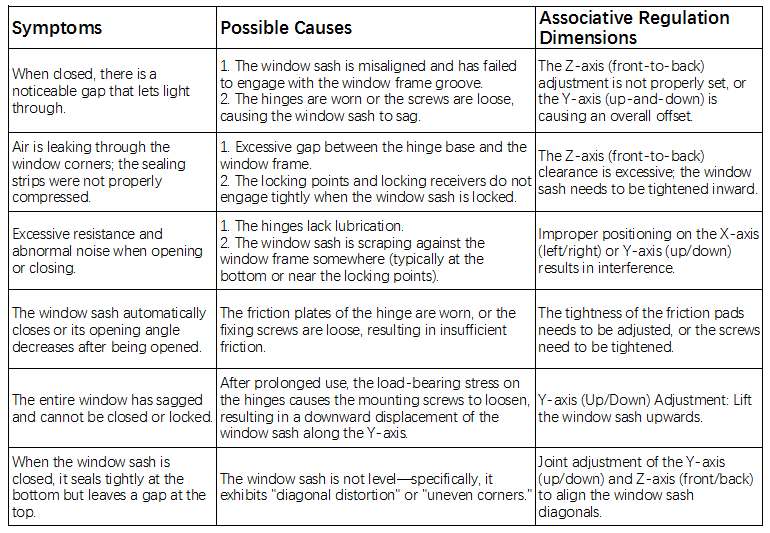
- Poor window sealing essentially stems from a failure of the sealing strips on the window sash to establish sufficient and uniform contact pressure against the window frame. The fundamental function of the hinge is to precisely control the position of the window sash within three-dimensional space:
- X-axis (Left-to-Right): Determines whether the locking points align accurately with their corresponding locking receivers when the sash is secured, as well as the clearance between the side of the sash and the window frame.
- Y-axis (Up-and-Down): Determines whether the sash is level—specifically, whether there is any “sagging” at the corners—thereby influencing the uniformity of the seal along the top and bottom edges.
- Z-axis (Front-to-Back): Determines the degree to which the sealing strips are compressed when the sash is closed. This is the dimension that most directly impacts sealing performance.
- By grasping these three directional axes, we gain access to the “navigation map” required for effective adjustment.
- Poor window sealing essentially stems from a failure of the sealing strips on the window sash to establish sufficient and uniform contact pressure against the window frame. The fundamental function of the hinge is to precisely control the position of the window sash within three-dimensional space:
II. Diagnosis First: What Is Your Window’s “Ailment”?
Before making any adjustments, a diagnosis is essential. Different “symptoms” call for different directions and degrees of adjustment. Do not make blind, haphazard adjustments; otherwise, you may only make matters worse.
- Common “Ailments” and Analysis of Causes
- Preparation: Tools and Safety
- Before commencing any adjustment work, please ensure you have the following tools ready and prioritize safety—particularly when working with outward-opening casement windows.
- Essential Tools:
- Hex Key (commonly known as an “Allen wrench”): The most common adjustment tool; standard sizes include 3mm, 4mm, and 5mm. It is recommended to have a complete set on hand.
- Phillips Screwdriver: Used to adjust screws on specific models or to remove decorative covers.
- Flathead Screwdriver: Used to pry open decorative covers or to assist with fine-tuning adjustments.
- Pliers: Used for minor straightening or to assist with securing components.
- Pencil: Used to mark the position of the hinge base before adjustment, making it easier to revert to the original setting or track the extent of the adjustment.
- Lubricating Oil/Grease: Used to maintain the hinges once adjustments are complete.
- Safety Precautions:
- When working with outward-opening casement windows, you must wear a safety harness or have another person assist in steadying your body to prevent leaning too far out of the window and risking a fall.
- Before removing the window sash, two people must work together: one person to support the sash while the other removes the screws, thereby preventing the sash from suddenly falling.
III. Practical Exercise: Step-by-Step Adjustment of Aluminum Window Hinges
Next, we move on to the core section—hands-on adjustment. We will explain the adjustment steps based on various specific “symptoms” of issues. Please follow the instructions sequentially, step by step.
- Step 1: Basic Maintenance—Cleaning and Lubrication
- In many cases, difficulty closing a window or the presence of strange noises does not indicate a need for adjustment, but rather that the hinges are excessively dirty or lack proper maintenance.
- Cleaning: Open the window completely. Use a brush or an old toothbrush to remove dust, grit, cobwebs, and other debris from the hinge linkages, tracks, and sliders. This debris is the primary culprit behind strange noises and premature wear.
- Lubrication: Spray or apply a specialized lubricant for door and window hardware to all rivet points and slider tracks (do not use cooking oil or standard grease, as these tend to attract dust and can corrode rubber components). Open and close the window a few times to allow the lubricant to penetrate the moving parts fully.
- Once you have completed this step, if the problem is resolved, congratulations—you need not proceed further. If the problem persists, move on to the next step.
- In many cases, difficulty closing a window or the presence of strange noises does not indicate a need for adjustment, but rather that the hinges are excessively dirty or lack proper maintenance.
- Step 2: Vertical (Y-Axis) Adjustment—Resolving Sash Sagging and Scraping
- Applicable Symptoms: Uneven gaps at the top or bottom of the window after closing; the bottom edge of the sash scrapes against the window frame during closing; difficulty engaging the locking points into their corresponding keepers.
- Adjustment Location: The screw holes where the hinge base attaches to the window frame. Typically, each hinge base features one or two elongated slots; these are the points used for vertical adjustment.
- Operation Steps (Using an Inward-Opening Casement Window as an Example):
- Determine the Adjustment Direction: If the sash is sagging (manifesting as scraping at the bottom and a gap at the top), the entire sash needs to be lifted upward. Conversely, if the sash is binding against the top of the frame, it needs to be adjusted downward.
- Loosen the Screws: Using an Allen wrench or a screwdriver, slightly loosen the mounting screws on the hinge base (do not remove them completely) so that the base can slide freely within the elongated slots.
- Note: Typically, a window features one hinge at the top and one at the bottom, sometimes with an additional support hinge in the middle. As a general rule, both hinges require adjustment.
- Perform the Lift/Lower Adjustment:
- Method 1 (Single-Person Operation): Using a flathead screwdriver or a sturdy pry bar, gently insert the tool into the gap between the window sash and the frame. Employing the principle of leverage, slowly pry the sash upward (or press it downward) until it reaches the desired position. Simultaneously, monitor a spirit level—or rely on your own judgment—to ensure the sash is perfectly level.
- Method 2 (Two-Person Operation): One person holds the window sash steady while the other performs the adjustment. This is the safest and most precise method available.
- Tightening Screws: Maintain the window sash in its newly adjusted position, then alternately and evenly tighten all the fixing screws on the hinges. When tightening, proceed gradually from one end to the other to prevent the sash from becoming warped due to excessive tension on a single side.
- Testing: Close the window to verify that the gaps are uniform and that the locking mechanism operates smoothly.
- Step 3: Horizontal (X-Axis) Adjustment — Resolving Locking Difficulties and Side Air Leaks
- Applicable Symptoms: When closing the window, the locking points and locking receivers bind or fail to engage fully; the gap between the side of the window sash and the window frame is either too wide or too narrow.
- Adjustment Locations: Typically located on the locking points on the window sash, or the locking receivers on the window frame; additionally, the sliders on certain types of hinges may feature eccentric adjustment screws.
- Operation Steps:
- Identify the Adjustment Components:
- Eccentric Locking Points/Receivers: These are the most common components for X-axis adjustment. The locking points or receivers typically consist of eccentric cylinders; when rotated with an Allen wrench, their central position shifts, thereby altering the engagement depth during the locking process.
- Hinge Slider Adjustment: Some hinge sliders feature an Allen screw; rotating this screw allows for fine-tuning the slider’s position within its track, thereby shifting the window sash horizontally (left or right).
- Adjusting Eccentric Locking Receivers:
- Observe the locking receiver, it typically features one or two “calibration marks.” Insert an Allen wrench into the central hole of the receiver.
- Rotating clockwise typically shifts the receiver’s position inward.
- Rotating counter-clockwise shifts the receiver’s position outward.
- Principle: Adjust until the window locks with a sensation of slight resistance—but without requiring excessive force—and the sealing strips around the entire perimeter of the window sash are evenly compressed. Do not overtighten, as this will accelerate wear on the hinges and locking points, and may even cause the handle to become difficult to return to its original position.
- Adjusting Hinge Sliders (If Applicable):
- Locate the adjustment screw on the slider, loosen it, slide the slider along its track to the desired position, and then retighten the screw.
- Identify the Adjustment Components:
- Step 4: Front-to-Back (Z-Axis) Adjustment — Core Sealing Adjustment
- Applicable Symptoms: This is the most critical step for resolving issues related to air leaks, water leaks, and light penetration. Symptoms manifest as visible gaps between the window sash and the window frame after the window is closed, or the sensation of cold drafts when placing a hand near the window’s edge.
- Adjustment Location: The junction between the hinge base and the window frame. In addition to slotted holes, some hinge bases feature a double-layer structure; these allow for the adjustment of the base’s thickness—and consequently, the distance between the window sash and the frame—via side-mounted set screws or eccentric rivets.
- Operation Steps (for different hinge types):
- Type A: Hinges with Independent Adjustment Set Screws
- Locate the Set Screw(s): On the side of the hinge base, you will find one or two hex-socket set screws positioned perpendicular to the plane of the window frame.
- Loosen the Fixing Screws: First, slightly loosen the main screws that secure the hinge base to the window frame.
- Adjust the Set Screw(s): Rotate the set screw; this action pushes a section of the base outward (or inward), thereby altering the overall thickness of the hinge assembly.
- Adjust Inward: Tighten the set screw clockwise to pull the window sash closer to the frame, thereby compressing the sealing strip.
- Adjust Outward: Loosen the set screw counter-clockwise to move the window sash away from the frame.
- Tighten the Main Screws: Once the adjustment is complete, firmly tighten the main fixing screws.
- Type B: Hinges Without Independent Set Screws (Adjusted via Base Shims)
- Loosen the fixing screws on the hinge base.
- Insert or remove shims (spacers) between the hinge base and the window frame as needed. (These shims may be the original metal shims provided, or they may be temporarily substituted with plastic strips—though the latter is not recommended for long-term use.)
- Adding shims moves the window sash away from the frame; removing shims moves the sash closer to the frame.
- Retighten the screws.
- Type C: 3D Adjustment for Concealed Hinges
- Remove the decorative cover plate located over the hinge mechanism.
- Locate the adjustment screws marked “↕” (up/down), “↔” (left/right), and “⊙” (forward/backward).
- Fore-and-aft adjustment is typically controlled by an eccentric screw located on the side of the hinge; by rotating it, you can visually observe the window sash moving closer to or further away from the window frame.
- Type A: Hinges with Independent Adjustment Set Screws
- Step 5: Diagonal Correction — Resolving Complex Warping Issues
- If, after performing the single-axis adjustments described above, the window still exhibits uneven diagonal sealing—specifically, being “tight at the top corners and loose at the bottom corners”—it indicates that the window sash has become warped and requires diagonal correction.
- Procedure:
- Identify the Direction of Warping: Close the window and observe the gaps. If the top-left corner is tight (the sealing strip is compressed too tightly) while the bottom-right corner is loose (a gap is visible), this indicates a diagonal warp running in a “top-left to bottom-right” direction.
- Loosen Diagonal Hinges: Slightly loosen the fixing screws on the hinges located at the two opposing corners. For instance, in the scenario described above, loosen the hinge screws corresponding to the top-left and bottom-right corners.
- Apply Counter-Force: Have one person steady the window sash while gently applying a force opposite to the direction of the warp (e.g., gently pushing the top-left corner outward while pulling the bottom-right corner inward) to restore the sash to a flat, level position.
- Tighten Screws: While maintaining the applied counter-force, tighten the screws that were previously loosened.
- Test and Repeat: Close the window and inspect the uniformity of the seal at all four corners. Multiple minor adjustments may be required to achieve the ideal alignment.
- Professional Advice: Diagonal correction requires a certain level of experience and a delicate touch. If you are unable to resolve the issue after several attempts, it is recommended that you contact a professional window and door repair technician; excessive adjustment can lead to hinge damage or create concentrated stress on the glass, potentially causing it to shatter spontaneously.
IV. Post-Adjustment Verification and Long-Term Maintenance
Once the adjustment is complete, verification is mandatory to ensure the effectiveness of the adjustments. Furthermore, proper long-term maintenance must be performed to extend the service life of both the hinges and the entire window unit.
- How to Verify Sealing Effectiveness?
- The A4 Paper Test Method (Most Commonly Used):
- Take a sheet of A4 paper and insert it at various points along the window frame after the window has been closed (specifically at the four corners and the center).
- Attempt to pull the paper out. If the paper is held firmly in place—requiring significant effort to extract—it indicates that the seal is effective at that specific location.
- If the paper slides out easily, it indicates that a gap still exists at that location, necessitating further fine-tuning along the Z-axis (front-to-back) direction.
- Tactile and Auditory Testing:
- Close the window, then run the back of your hand along the perimeter of the window frame to detect any airflow or drafts.
- On windy days or in noisy environments, listen carefully to determine if any wind noise is penetrating the interior.
- Locking Mechanism Feel Test:
- Rotate the handle to assess the locking process; it should feel smooth and offer an appropriate level of resistance (damping). The movement should not be excessively loose (indicating that the locking points are not engaging firmly enough), nor should it be excessively stiff or difficult (indicating that the mechanism is too tight).
- Visual Alignment Check:
- Stand at a distance and visually inspect the gaps between the window sash and the surrounding frame to ensure they are uniform and parallel on all sides.
- The A4 Paper Test Method (Most Commonly Used):
- Key Points for Long-Term Maintenance
- Regular Cleaning: It is recommended to clean the hinges every six months, particularly in regions prone to heavy wind and sand.
- Regular Lubrication: After cleaning, apply a specialized lubricant; the frequency of lubrication should coincide with the cleaning schedule.
- Screw Inspection: Quarterly, check the screws securing the hinges and handles to ensure they are not loose; tighten them immediately if necessary.
- Avoid Forceful Operation: When opening the window, always use the handle; do not forcefully push or pull the sash directly. Before closing, ensure that no foreign objects (such as flower pots or clothes hangers) are obstructing the sash.
- Mind the Load: Do not hang excessively heavy objects (such as heavy curtains or flower pots) on the window sash, as this will accelerate hinge wear and deformation.
V. Summary: Small Adjustments, Big Impact
Adjusting aluminum window hinges may seem like a trivial task, but in reality, it is a matter of great significance concerning home comfort, energy consumption, and safety. Through the systematic overview provided in this article, you should now recognize that—with nothing more than an Allen wrench, a little patience, and the right approach—you can resolve most issues related to poor window sealing.
Key Takeaways:
- Prioritize Diagnosis: First, identify the specific problem—whether it is an air leak, scraping, or sagging—and then adjust the X, Y, or Z axes accordingly.
- Three-Dimensional Coordination: Hinge adjustment involves coordination within a three-dimensional space; often, it requires making simultaneous micro-adjustments in multiple directions.
- Proceed Gradually: Avoid making drastic adjustments at any one time; the optimal strategy is to “make small tweaks and test repeatedly.”
- Safety First: When working on outward-opening windows, always prioritize your personal safety; if necessary, seek assistance from a professional.
Properly adjusted hinges not only protect your home from the elements but also reduce energy consumption for air conditioning and heating, thereby contributing to environmental conservation. Starting today, pick up your tools and restore your windows to a state of perfect, airtight closure!
VI. FAQ
To help you resolve practical issues more quickly, we have compiled the following list of frequently asked questions and their answers.
Q1: My windows open inward (inward-opening casement); is the adjustment method the same as for outward-opening windows?
- A: The basic principles are the same, but the operation is more convenient. Inward-opening windows pose lower safety risks, allowing you to perform adjustments with greater ease. The key focus of the adjustment remains on the three dimensions: vertical alignment (to prevent scraping the sill), horizontal alignment (to prevent interference), and front-to-back alignment (to ensure a tight seal). Please note that the load-bearing direction of the hinges on inward-opening windows is opposite to that of outward-opening windows; consequently, they are more prone to sagging issues after prolonged use.
Q2: What should I do if I find that a screw cannot be turned—or has stripped—while attempting to make adjustments?
- A: This is typically caused by rust on the screw or because the screw was overtightened previously.
- Minor Rust: You can start by spraying a small amount of WD-40 rust remover onto the screw, then wait a few minutes before attempting to turn it again.
- Stripped Screw: If the internal hex socket is stripped, try using an Allen wrench that is slightly larger than the original size, or wrap a thin layer of rubber (such as a rubber band) around the screwdriver bit to increase friction. If these methods do not resolve the issue, you may need to replace the screw or the entire hinge assembly. Attempting to force the screw may damage the hinge base; therefore, we recommend contacting a professional repair service.
Q3: After making adjustments, the window has actually become harder to close. What could be the problem?
- A: This indicates that the adjustment was either excessive or performed in the wrong direction. The most common issue is over-tightening along the Z-axis (front-to-back), which causes a drastic increase in friction between the window sash and the frame, or causes the locking points to bind against their receivers. In this situation, you should reverse the previous adjustment to restore the window to its pre-adjustment state. Then, attempt to readjust it again using smaller increments (e.g., turning the screw by just half a turn), and repeatedly test the ease of opening and closing.
Q4: If the hinges are severely deformed or rusted, will adjusting them still be effective?
- A: If the hinges exhibit visible deformation, loose rivets, or severe corrosion that has caused the connecting arms to snap, then simple adjustment will no longer resolve the issue. In such cases, it is recommended that you replace the entire set of hinges. When replacing them, please note: be sure to select a product with specifications identical to the original hinges (e.g., matching length and mounting hole spacing); otherwise, installation may be impossible, or the window’s functionality could be compromised.
Q5: Will adjusting the hinges affect the window’s thermal insulation and soundproofing performance?
- A: Yes, it will. Airtightness serves as the foundation for both thermal insulation and soundproofing. Proper hinge adjustment ensures that the sealing strips are compressed evenly, thereby significantly enhancing the window’s thermal and acoustic performance. Conversely, if improper adjustment leads to a failure in the seal, the effectiveness of both thermal insulation and soundproofing will be severely compromised.
Q6: Why is there still a large gap above the window even after I have adjusted all the screws?
- A: This issue typically cannot be resolved through simple hinge adjustments alone. Possible causes include:
- Deformation of the Window Frame or Wall: Structural settlement or improper installation has caused the window frame itself to become uneven.
- Glass Installation Issues: Improper placement of glass setting blocks has caused the window sash to twist or deform.
- Incorrect Hinge Model: The installed hinges do not match the window’s dimensions (length or height) and are unable to provide adequate support.
- We recommend consulting a professional door and window installer to visit the site and diagnose the problem.
Q7: How often do the hinges need to be adjusted?
- A: There is no fixed schedule; adjustments should be based on actual usage conditions. Newly installed windows may require an initial fine-tuning after experiencing a full cycle of winter and summer seasons, due to thermal expansion and contraction, as well as the settling-in of the hardware components. Subsequently, targeted adjustments are only necessary if you notice a change in the feel of opening or closing the window, detect air drafts, or hear unusual noises.
Q8: Is it necessary to remove the window sash during adjustment?
- A: For most minor adjustments—such as adjusting height, depth, or locking points—it is not necessary to remove the window sash. Removing the sash is recommended only when the hinges need to be replaced or when significant diagonal alignment corrections are required. Since removing the window sash carries a higher risk, it is advisable to have two people work together to perform this task.
Based on the information above, we trust that you have now mastered the key principles of adjusting aluminum window hinges. Give it a try yourself—restore your windows to a completely airtight seal and quietly enjoy a comfortable life.