
1. Why Old Friction Stays Fail – The Real Cost of Sagging
The Invisible Problem
- Most homeowners ignore a slightly sagging window until:
- Air leaks increase HVAC bills by 15–20% (DOE data)
- Water intrusion rots the sill and wall below
- Security gap allows a screwdriver to pop the window open from outside
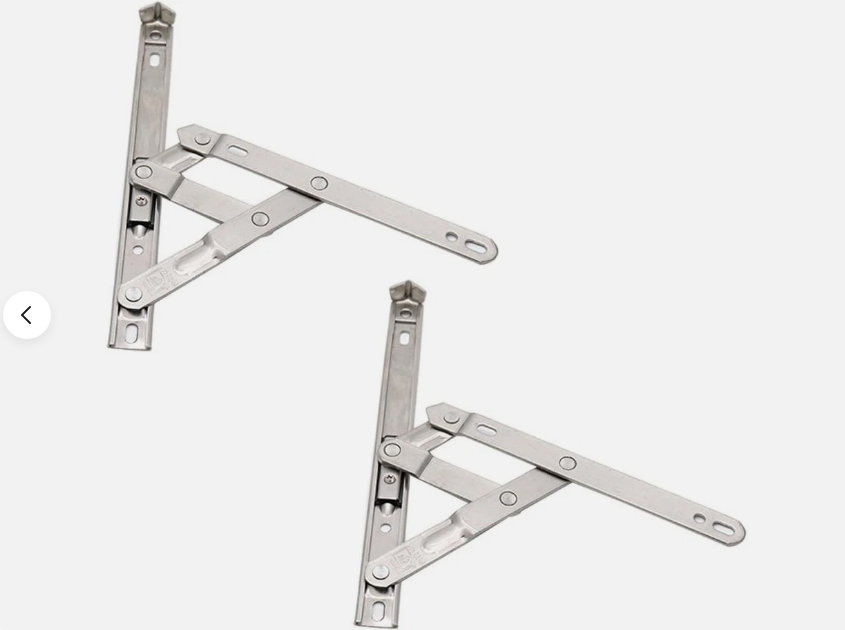
- Friction stays (also called hinges or stacking stays) are the metal arms with a sliding channel that let a casement window open outward. Every time you open the window, the friction mechanism wears slightly.
Three Main Failure Modes
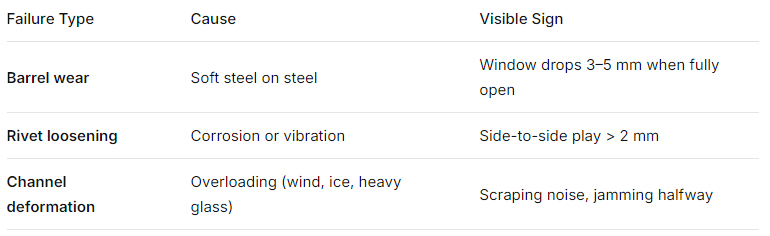
- Real-world example: A 1990s double-glazed casement window with original 22 kg-rated stays supporting a 35 kg sash. That’s a 60% overload – failure is guaranteed within 3–5 years.
The High-Load Alternative – What It Solves
- High-load friction stays are re-engineered for:
- Static load capacity up to 100 kg (vs. typical 25–40 kg)
- Marine-grade stainless steel (AISI 316) for coastal areas
- Deep-drawn channels to prevent lateral bending
- Solid rivets with nylon washers for smooth friction without metal galling
- Result: No sag, even with heavy triple-glazing or oversized vents.
2. How to Diagnose Your Window’s Condition (3 Quick Tests)
- Before buying parts, run these diagnostics. Each test takes <1 minute.
- Test 1 – The “Open & Lift” Test
- Open the window 90°.
- Lift the outer corner of the sash (far from hinges) with one finger.
- Pass: No vertical movement.
- Warning: 2–4 mm movement – moderate wear.
- Fail: >5 mm movement – immediate retrofit needed.
- Test 2 – The “Parallel Gap” Test
- Close the window and hold a credit card against the frame on the hinge side.
- If the card slides freely at the top but binds at the bottom → the sash has dropped due to worn stays.
- Close the window and hold a credit card against the frame on the hinge side.
- Test 3 – Rivet Inspection
- Open the window and look at each rivet on the stay arms.
- Black residue around rivet → metal fretting (advanced wear)
- One rivet visibly higher than others → plastic deformation of channel
- Pro tip: Take photos with your phone. Compare with manufacturer drawings (e.g., Cotswold, Roto, Siegenia). Many retrofit kits are universal – but matching the length (e.g., 400 mm, 550 mm) and stack height (13 mm, 17 mm) is critical.
- Open the window and look at each rivet on the stay arms.
- Test 1 – The “Open & Lift” Test
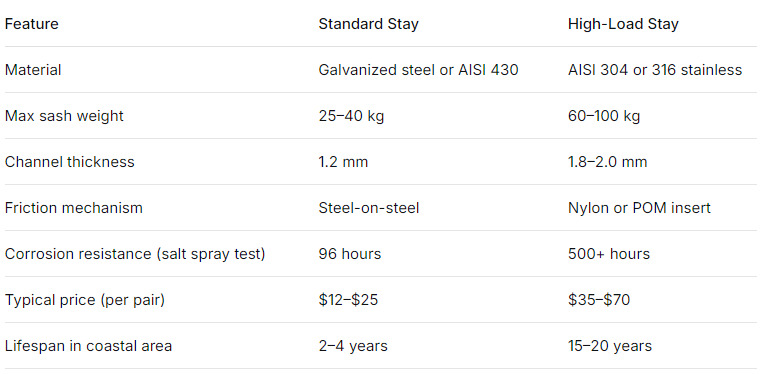
3. High-Load vs. Standard Friction Stays – Key Differences
- Quick Comparison Table
- Why “High-Load” Doesn’t Mean Stiff Operation
- Many people worry that stronger stays will be harder to open. Not true.
- High-load designs use constant-force friction technology – a stack of belleville washers or a polymer glide pad that provides smooth resistance regardless of sash weight. You get:
- Effortless movement (similar to original)
- No sudden dropping
- Wind-resistant hold-open friction
- When to Choose High-Load (Even if Your Window Isn’t Heavy)
- ✅ You live in a high-wind zone (coastal or high-rise)
- ✅ The window has large glass (e.g., 1200 mm wide)
- ✅ You plan to install heavy accessories (shutters, external blinds)
- ✅ The original stays failed twice already (undersized system)
4. Step-by-Step Retrofit Guide (With Tools List)
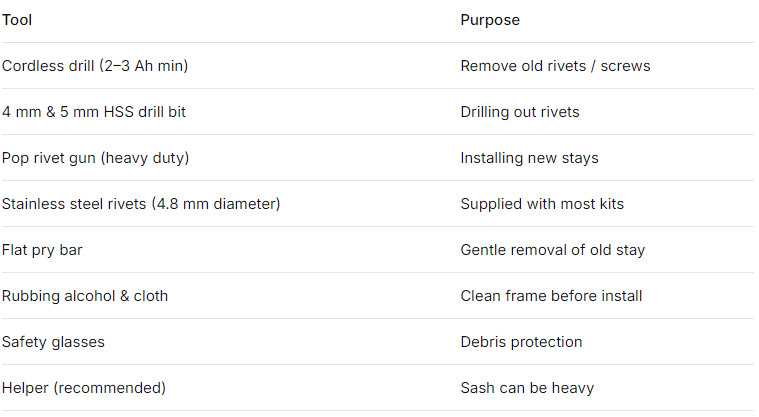
- Tools & Materials Needed
- Step 1 – Remove the Window Sash (15 minutes)
- Open window fully.
- Locate the hinge release button (usually top and bottom of the friction stay).
- Depress with a flathead screwdriver while lifting the sash off the frame.
- Lean sash safely against a padded wall.
- Warning: Older windows may have no release button – instead, unscrew the stays from the sash first, then from the frame.
- Step 2 – Remove Old Friction Stays (10 minutes)
- If riveted: Drill through the center of each rivet. The head will pop off. Push remaining pin through.
- If screwed: Use correct bit (often T20 or Phillips). Apply penetrating oil if rusted.
- Step 3 – Measure & Match (5 minutes – most critical step)
- Measure the three key dimensions of the old stay:
- Length closed (center to center of end rivets)
- Stack height (thickness of the closed channel + arm)
- Hole pattern (distance between mounting holes on frame side)
- Universal high-load stays from brands like Mighton (UK) , Truth Hardware (US) , or Maco (EU) cover 90% of common sizes. If your window is off-brand, take a photo and email a supplier (e.g., windoorshardware.com) – they will match it for free.
- Measure the three key dimensions of the old stay:
- Step 4 – Install New High-Load Stays (20 minutes per sash)
- Align the new stay with the frame mounting holes.
- Use the supplied stainless rivets (or screws if the kit includes them).
- Attach the stay to the sash second – leave rivets/screws slightly loose until the sash is test-fitted.
- Re-hang the sash onto the frame stays.
- Tighten all fasteners fully.
- Step 5 – Adjust & Test (10 minutes)
- Open and close 3–4 times. Friction should be even throughout.
- Check parallel gap test again (credit card method).
- Apply silicone spray (not WD-40) to the friction channel once per year.
- Total time: ~1 hour for a typical pair of casement windows. Hire a handyman if uncomfortable – labor typically $80–$120 per window.
5. Pro Tips: Avoiding the 4 Most Common Mistakes
Mistake #1 – Mixing Stay Lengths
❌ Buying a 500 mm stay when you need 450 mm.
✅ Measure from center of end rivet to center of end rivet on the closed stay.
Mistake #2 – Using Aluminum Rivets
❌ Aluminum rivets corrode against steel stays (galvanic corrosion).
✅ Always use stainless steel rivets (included with quality high-load kits).
Mistake #3 – Ignoring Frame Condition
If the wooden or uPVC frame is soft/rotted around the mounting holes, new stays won’t hold.
Fix: Drill out to next size and use a threaded insert (e.g., Helicoil for metal frames) or epoxy filler for wood.
Mistake #4 – Over-tightening the Friction Screw (if adjustable)
Some high-load stays have a friction adjustment screw. People crank it down, making the window impossible to close.
Rule: Adjust until the sash just stays open at any angle – no tighter.
6. Cost-Benefit Analysis: Retrofit vs. Replace
- Real-World Pricing (US & EU, 2025)
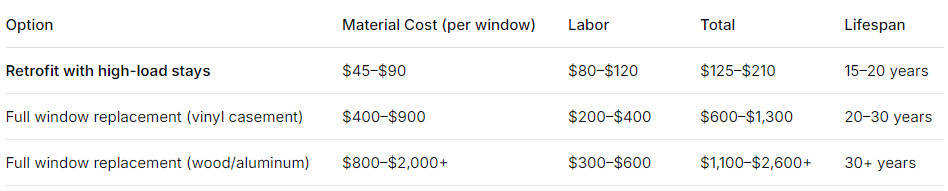
- Savings per window: $390 to $2,400 by retrofitting.
- Non-Financial Benefits of Retrofitting
- ✅ No interior disruption (no drywall repair, repainting, or trim removal)
- ✅ Preserves historic character (original frames remain)
- ✅ Environmentally friendly – keeps 50+ lbs of aluminum/vinyl out of landfill per window
- ✅ Faster – retrofit done in hours vs. weeks for custom replacements
- When Retrofit Is NOT Recommended
- Frame itself is rotted, cracked, or warped >6 mm
- Glass seal failed (fog between panes) – replace entire IG unit at same time as stays
- Window is non-standard size (e.g., custom arch top) and stays are unavailable
7. FAQs – Answered by Window Engineers
Q1: Can I retrofit any casement window with high-load stays?
A: Almost any, as long as the frame channel is not completely destroyed. You need a flat mounting surface and matching hole spacing. Universal adaptor plates exist for odd patterns (e.g., Cotswold Universal Plate).
Q2: How do I know the correct stack height?
A: Stack height = thickness of the closed stay. Common sizes: 13 mm (most uPVC), 17 mm (aluminum), 21 mm (heavy timber). Measure with a caliper. If you buy 13 mm for a 17 mm recess, the sash will bind.
Q3: My window is top-hung (awning). Same stays work?
A: Yes, friction stays are identical for side-hung (casement) and top-hung (awning). The only difference is that awning windows may require a hold-open arm if they open more than 30°. High-load stays usually include this feature.
Q4: Do I need to replace both top and bottom stays?
A: Yes, always replace as a pair. One new and one old will create uneven friction and faster wear.
Q5: Will high-load stays make my window harder to close?
A: No – when correctly adjusted, they feel similar to original stays. The friction mechanism is designed for constant effort regardless of load.
Q6: Can I use high-load stays on a window that originally had no stays (e.g., old jalousie)?
A: No – jalousie windows use different hardware (cranks and pivot bars). Friction stays require a framed sash.
Q7: What brands are most reliable for high-load retrofits?
A:
- North America: Truth Hardware (Series 600HD), Pella ProLine
- Europe: Siegenia (Titan AV2), Roto (N500 HD), Maco (Multi-Matic HD)
- Universal: Cotswold (Type C HD), Mighton (MP40)
Q8: My window is 20 years old – are parts still available?
A: Yes. Standard lengths (300–700 mm in 50 mm increments) are widely stocked. Obsolete sizes can be custom-made (2–4 week lead time, +50% cost).
Q9: How often should I lubricate high-load stays?
A: Once every 12 months with dry PTFE spray or silicone spray. Never use grease or oil – they attract dust and cause jamming.
Q10: Is this a DIY job or need a pro?
A: DIY if you have a drill, rivet gun, and basic patience. Hire a pro if:
- Windows are above ground floor (fall risk)
- Frame has hidden rot
- You have >10 windows (bulk discount on labor)
8. Conclusion & Next Actions
- Summary of Key Points
- ✅ Sagging windows are almost always fixable with high-load friction stays – no full replacement needed.
- ✅ Diagnosis takes 3 minutes with simple tests (lift, gap, rivet check).
- ✅ High-load stays solve strength, corrosion, and smooth operation in one upgrade.
- ✅ Retrofit costs $125–$210 per window vs. $600–$2,600+ for replacement.
- ✅ One-hour DIY project or quick handyman job.
- Your 3-Step Action Plan
- This week: Perform the 3 diagnostic tests on your worst window. Take photos and measurements.
- Next week: Order high-load retrofit kit (use the brand/measurement guide above).
- Within 2 weeks: Install or hire help. Then enjoy smooth, sag-free windows for the next 15+ years.